

")
By this week, I am hoping I can call you friend 🙂 Welcome to Part 3 of the Garden Party Jacket Crochet Along, Friends! (See what I did there?!)
Up this week: Body Assembly & Sleeves
If you’ve missed the “The Info & Supply” post, you can find that: HERE
If you’ve missed “Part 1: Gauge & Squares/Pt.1”, you can find that: HERE
If you’ve missed “Part 2: Squares/Pt. 2 & Blocking”, you can find that: HERE
Enormous thanks and gratitude once again to the incredible translators and the CAL – Crochet A Long Group for their diligent work and amazing support. Below are the links for each alternate language. Simply click on your chosen language to be taken to the blog posting for this week!
Now, Let’s begin:
There are two steps to this week:
Step 1: Body Assembly
Step 2: Sleeves
STEP 1: BODY ASSEMBLY
First, I will teach you the seaming method I have used. Then, we will join our squares using that method. For the same reason I insisted on long tails and thorough weaving in of them, I am going to make sure that the squares stay secure with the same tenacity. I want to be sure you look polished in this sweet jacket when you are done!
You will need:
- all your squares
- tapestry or yarn needle
- extra yarn in the same color as the outermost last round of your squares
This pattern has been MATHEMATICALLY DESIGNED, so each time you seam one square to the next, there will be a PERFECT match in the number of stitches to join: ch-1 to ch-1 and dc to dc. I really tried to make this as easy as I could for you lovely folks, and I hope so far you agree!
To begin: Grab 2 Small (A) squares. Make sure the RIGHT SIDE of both are facing up. The popcorns of the flower should puff towards you, and the right side of the stitches should be facing up. Position two of them side by side. Take a strand of yarn the same color as the outer/last round of your squares measuring about 24″ long, and thread on your needle.
We will employ what I am going to term a “double sided ladder stitch” to seam our squares together.
DO NOT LET THIS PART CONFUSE YOU! In short, we will be seaming under the top loops only, zigzag right to left, left to right from bottom to top first. Then, we will flip them over and do the same thing back down the squares in the remaining loops. I will detail it out below, but, I thought a summary would help.
***TAKE CARE TO NOT SEAM TOO FIRMLY OR BINDING SO THAT YOU LOSE THE NATURAL STRETCHY NATURE OF THE CROCHETED FABRIC. THIS IS IMPERATIVE TO WEARABILITY, AS THE GARMENT WILL BE STRETCHED WHEN WORN TO FIT CURVES OF THE BODY***
Beginning on the square on the right side (most likely you’ll work opposite if you’re a lefty), insert the needle from RIGHT TO LEFT, UNDER the TOP LOOP ONLY (the one on the top of the work and nearest to you) of the CHAIN 1 that is at the corner. Then, go under the top loop only of the coordinating ch-1 corner stitch of the opposite square, also from RIGHT TO LEFT, as shown here. Pull the yarn on the needle through until about 6″ are left dangling. You don’t need to pull tightly together just yet.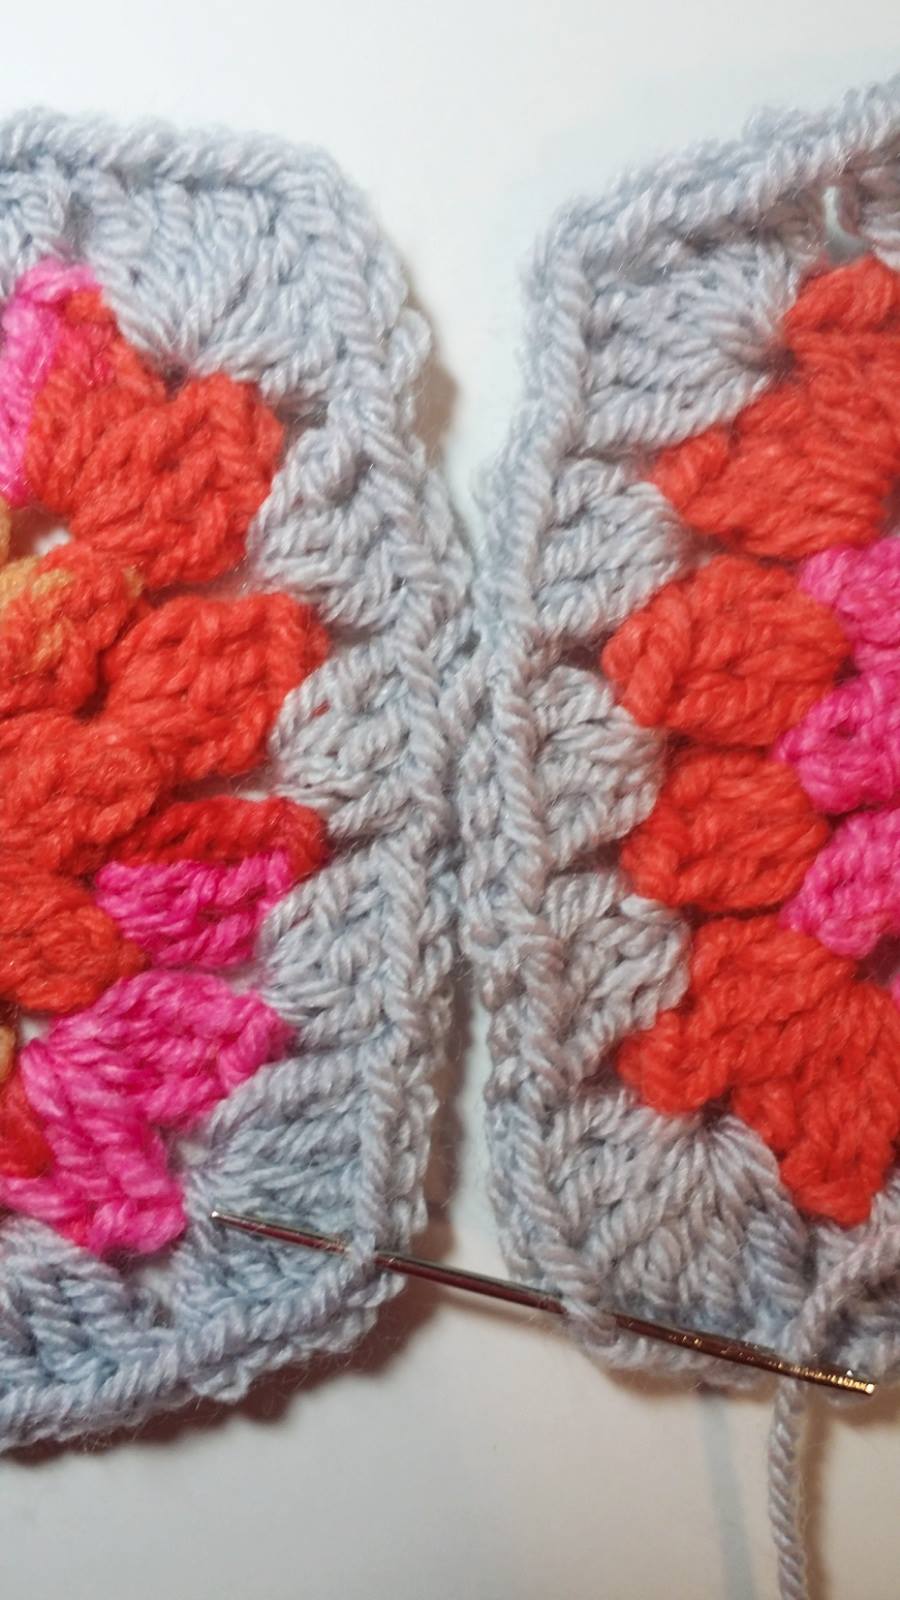
Now, go to the TOP LOOP ONLY of the double crochet on the same left square, just above the ch-1, and insert the needle from left to right under that top loop. Next, go to the coordinating dc on the right square and insert under the top loop of just that, also from left to right.
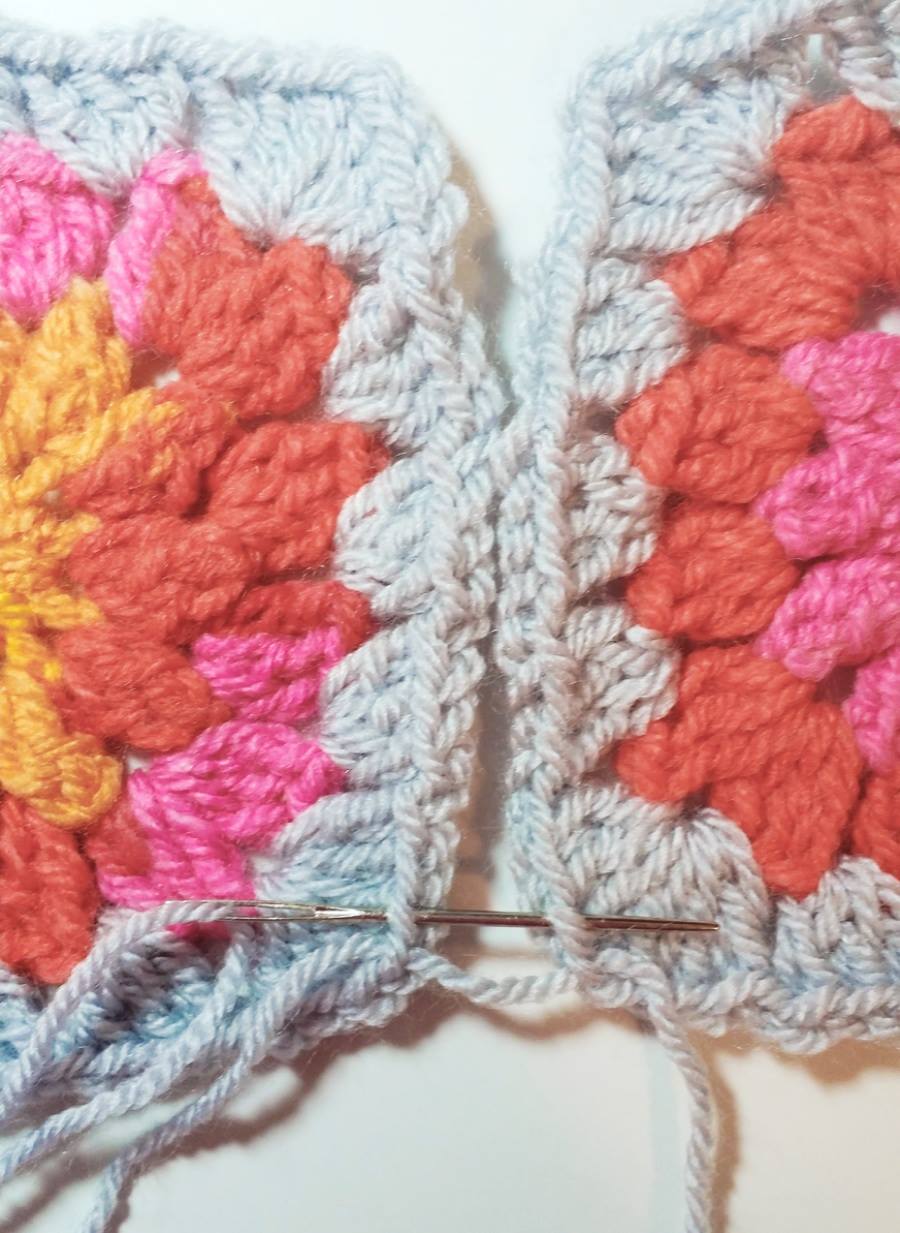
Continue to the next dc above the dc just stitched in the right square, and going through the top loop only, draw the yarn through that dc and the coordinating dc of the left square. Keep seaming back and forth, left to right, right to left, left to right, and so on. Stop after you seam the ch-1’s of each corner together at the top. Be careful to not pull too tightly and pucker the work.
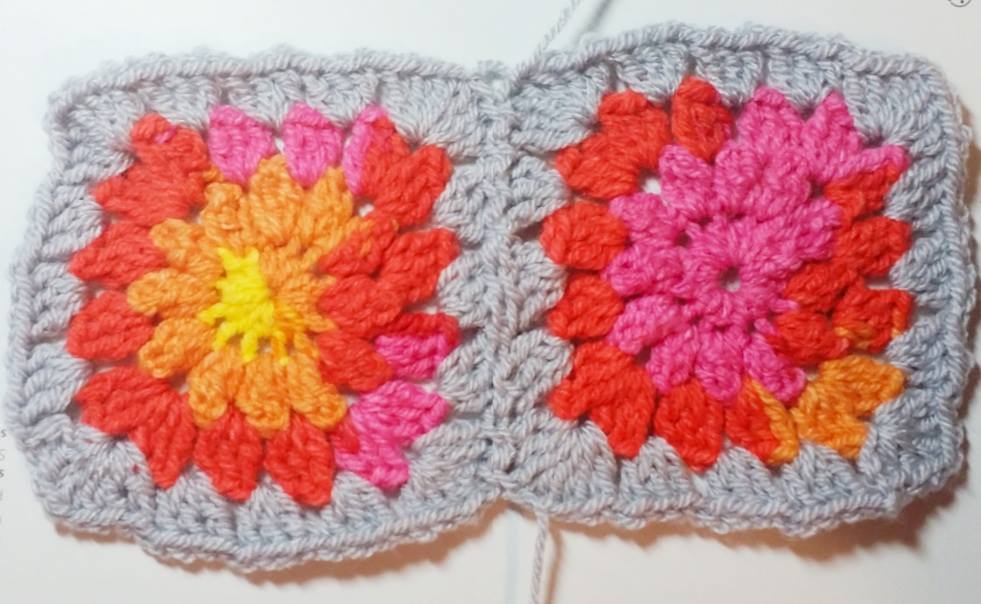
It creates a seam that is flat and secure and no ridge is left between the squares. When I haven’t taken a photo 2″ away from it, it’s pretty seamless looking as well! 😉
Now, let’s double secure! Flip those newly joined squares over so the WRONG SIDE is facing you. Notice how you are left with all the UNWORKED loops down the seam?(Remember we only caught the TOP LOOPS so far?)
Let’s go double duty, and using the SAME method as the front, we will work back DOWN the seam, picking up the remaining loops, right to left under the top loop only (opposite for lefties!) then left to right. EXACTLY the same as the front, but now we work top to bottom, as opposed to bottom to top. Match stitch for stitch again between the squares. Ch-1 at the corner to ch-1 at the opposite corner and so on. The photo below shows after I have worked back down the square.
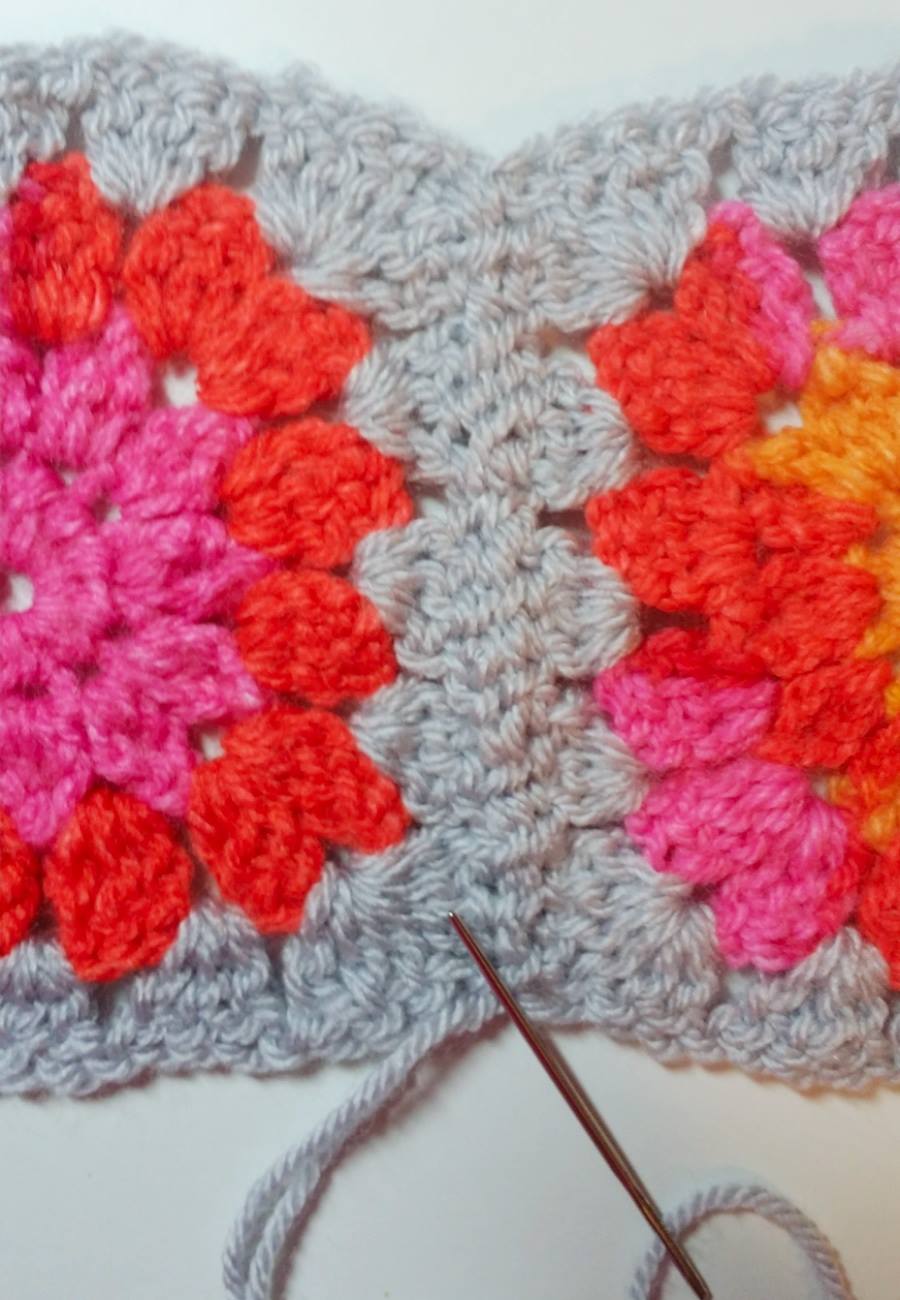
Then, while you are there, take a moment and weave in the beginning and end tails just as we did for the squares themselves.
Using this method, we will now join all of our squares as outlined below to completely assemble our main body section! We’re really coming together now!
To break it down: This pattern is basically just a puzzle of pieces that are assembled strategically to create a garment. Each smallest square is 1/2 the stitch count of the medium, and 1/4 the stitch count of the large. This holds true for every size.
To recap: The chart below denotes the number of 3dc groups on ONE side of each square for each square size and garment size: You count one 3dc group on the corner, all the 3dc groups along the edge and 1 3dc group of the opposite corner to determine the total # of 3dc groups that you have. Compare to the chart to be sure your squares are accurate.
| Garment Size | |||||
| Square Type | XXS/XS | S/M | L/XL | 2X/3X | 4X/5X |
| (A) Small | 4 | 5 | 6 | 7 | 8 |
| (B) Medium | 8 | 10 | 12 | 14 | 16 |
| (C) Large | 16 | 20 | 24 | 28 | 32 |
Referring to the chart above and keeping in mind the number of 3dc groups on ONE side of each square and then matching each dc to each dc, and each ch-1 space to each ch-1 space: position all squares right side up and begin with Step 1.
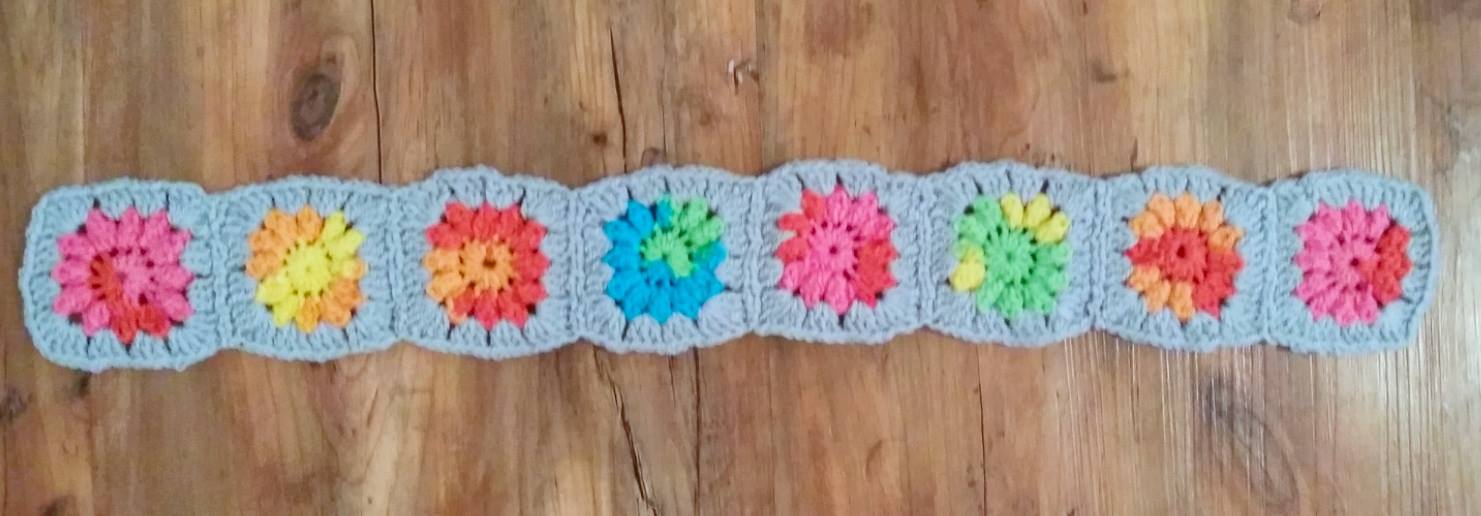
Step 1: Join all (8) SMALL squares on one side only, creating a long strip. You’ll note that since I used a multi color yarn, I’ve got different color centers on my squares. I took a moment and played around until I liked the order they were in before I began seaming.
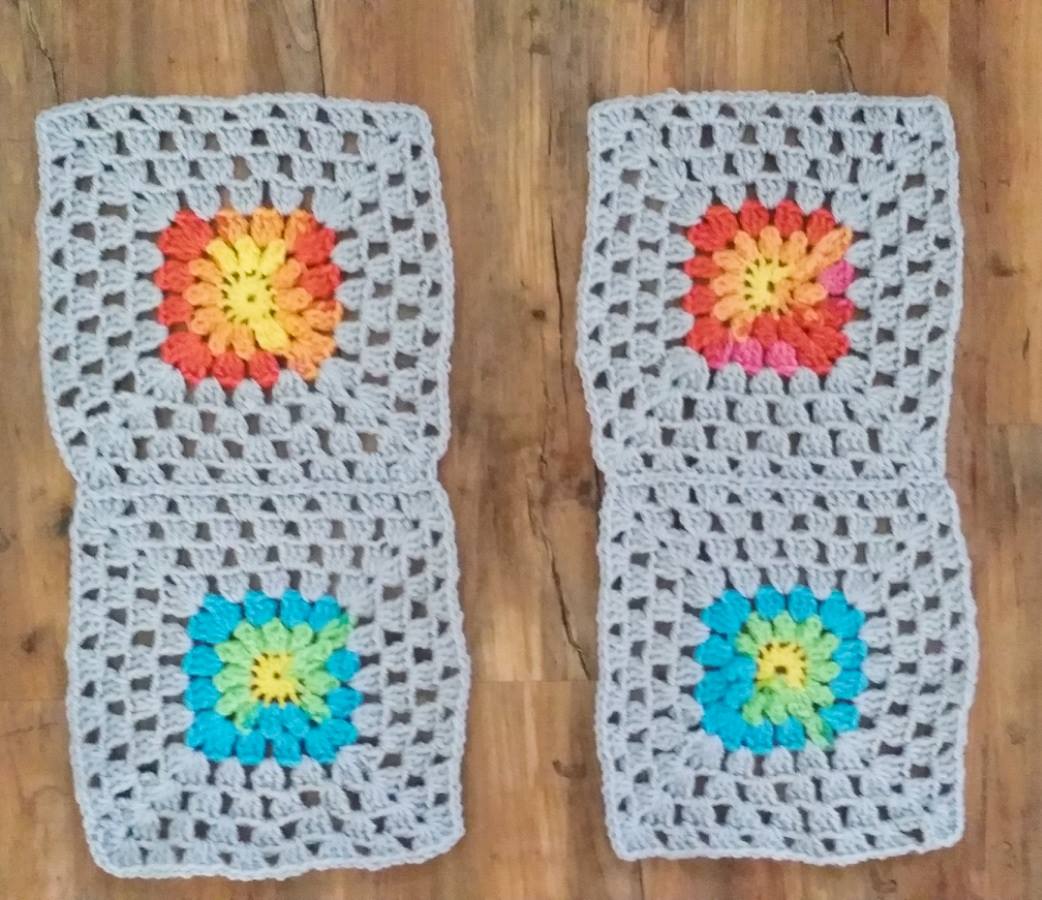
Step 2: Join one side of one MEDIUM square to one side of another MEDIUM square, creating a rectangle shape consisting of 2 squares. Do the same thing to the remaining 2 MEDIUM squares. Same thing here, I chose to arrange the squares by the color of the centers that emerged as I worked from my multi color yarn.
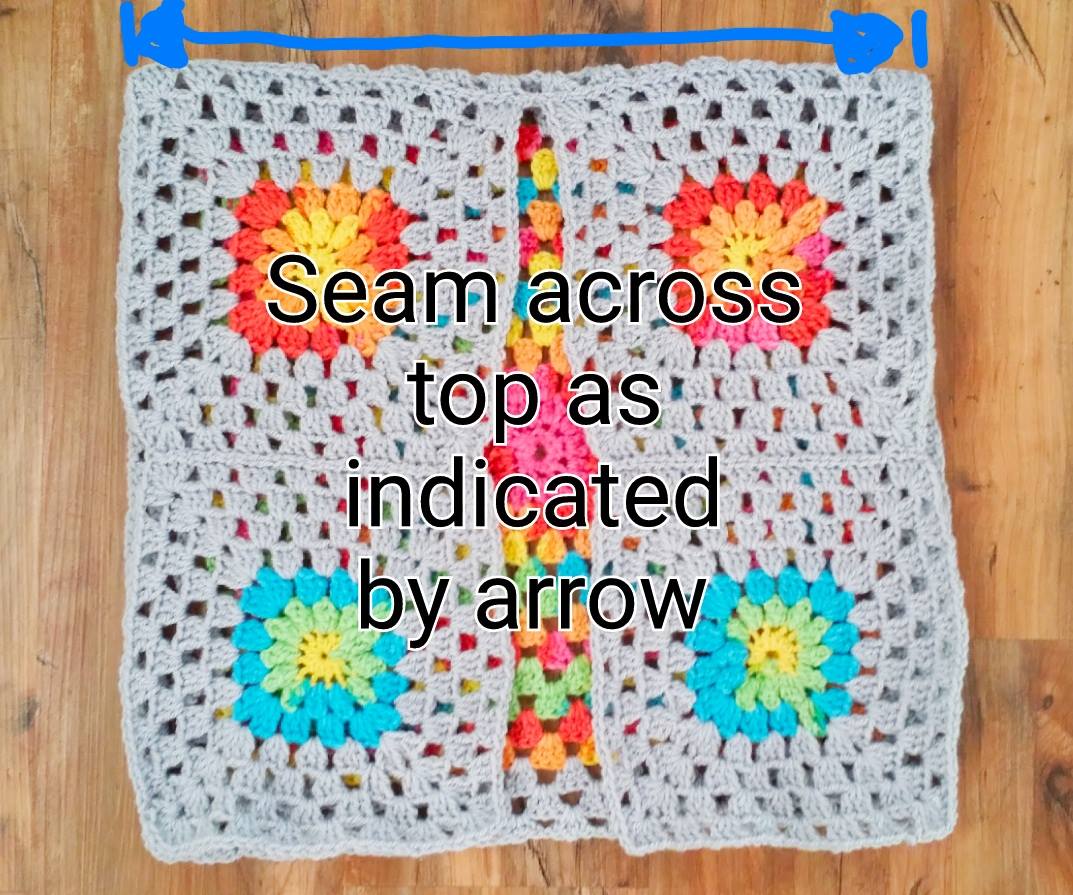
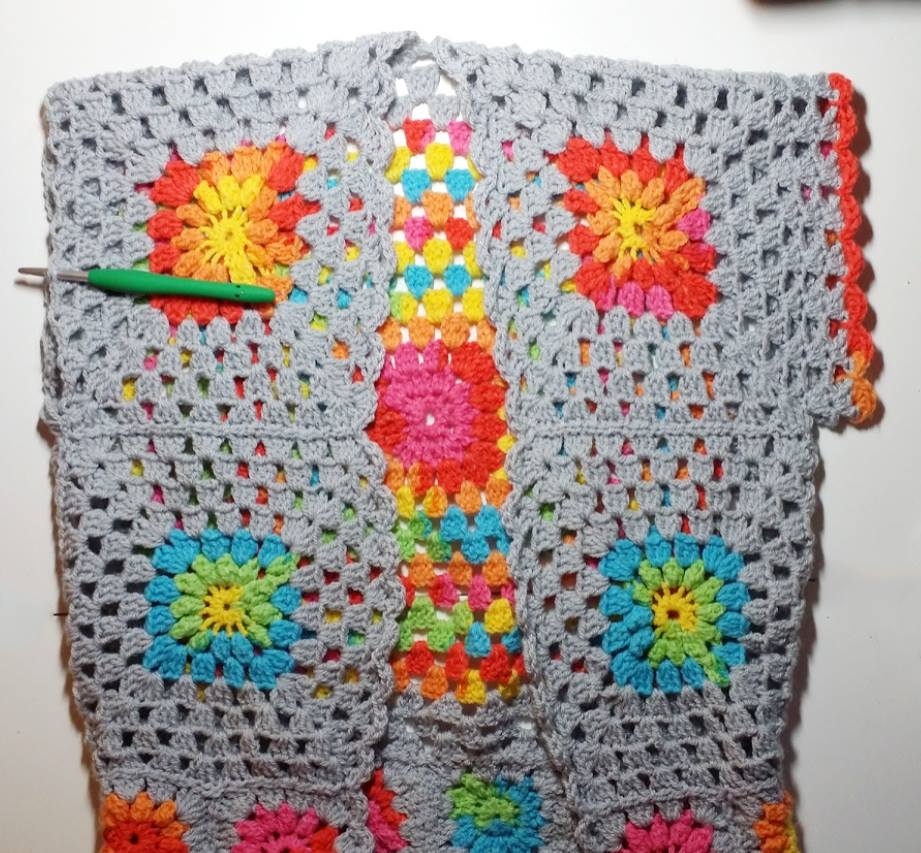
Step 3: With wrong sides facing each other, position one remaining free edge of a panel created of (2) MEDIUM squares, to the left side of the LARGE square, and seam into place across the top edge. Position the 2nd panel created of (2) MEDIUM squares, and attach the remaining free edge to the right top edge of the LARGE square. This creates the shoulder seams.
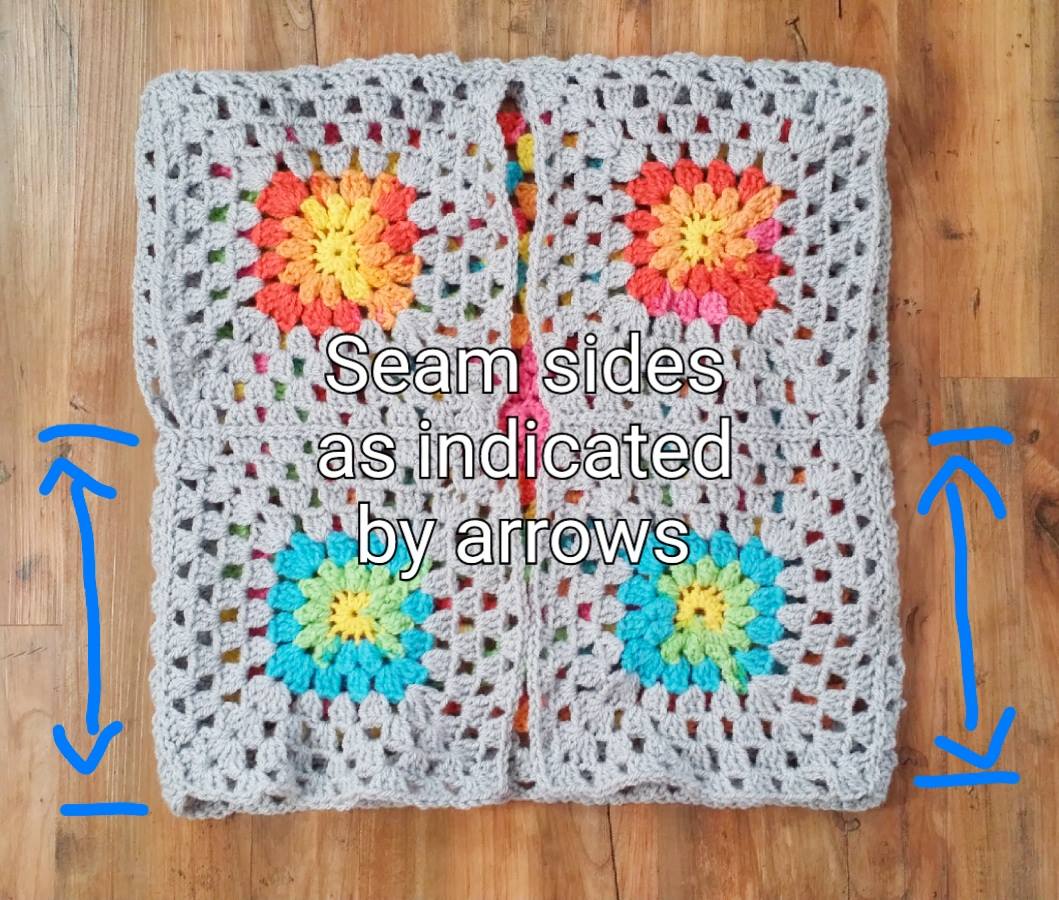
Step 4: Join the left edge of the bottom square of the left (2) medium square panel to the bottom 8 (10,12,14,16) 3dc groups of the large square on the back, creating an arm hole. Do the same thing on the right edge of the bottom square of the right (2) medium square panel to the bottom 8 (10,12,14,16) 3dc groups on the large square on the back, creating the second arm hole. **When stitching the top corner of the medium square at the mid-point of the large back square, stitch the ch-1 space at the corner and the nxt dc as well to the large square very securely. This creates the armpit of the garment and when we carry on for the sleeve if you do not do this, there will be a gap here. Check the Tips & Tricks Post HERE to alter if needed.
Step 5:
NOTE ABOUT SIZES AND BODY: READ ME.
We have attempted to fit as many bodies as possible, using averages from various size charts. As I am sure you are aware, we are all so different! For plus sizes, while the back width of a woman grows wider, it only grows somewhat taller. Therefore, we will DEPEND on the increased stretch of the fabric as it becomes larger to accommodate this body ratio, while still maintaining the “mathematical puzzle” aspect of the garment. SO:
********You may have to “squish” up your 8 Small Square strip or “stretch out” your Medium/Large square assembly to match up for seaming.***************
When worn, the large back square will stretch to fit across the back. In addition, here is the:
It will be available and updated throughout the CAL to alter for bodies or fit adjustments as we work! Bookmark it and check it often!
Join the strip made in step 1 of all (8) small squares to the remaining bottom edge of the (2) front panels made of 2 medium squares and across the bottom edge of the large back square as well.

Take a second and weave in all those ends at this point, you’ll be really happy you did at the end!
STEP 2: SLEEVES
Believe it or not, we are about half way done already! Next up, let’s create those cute little cap sleeves. Remember when I stated yardage requirements were given generously? Well, here is another reason why. You can add additional rounds onto the little sleeves as you like for your own preference. There is no shaping, per se, to the sleeve. It is simply worked in rounds off the opening created by seaming the squares together. So, should you choose to add rounds, keep in mind that the sleeves will have a kimono or butterfly look to them the longer you go, as opposed to a fitted sleeve. Just a heads up, so you know what to expect design-wise 🙂
DO NOT BECOME CONFUSED AT THE ARM PIT OR SHOULDER SEAM AREA:
Refer to this photo for the armpit:
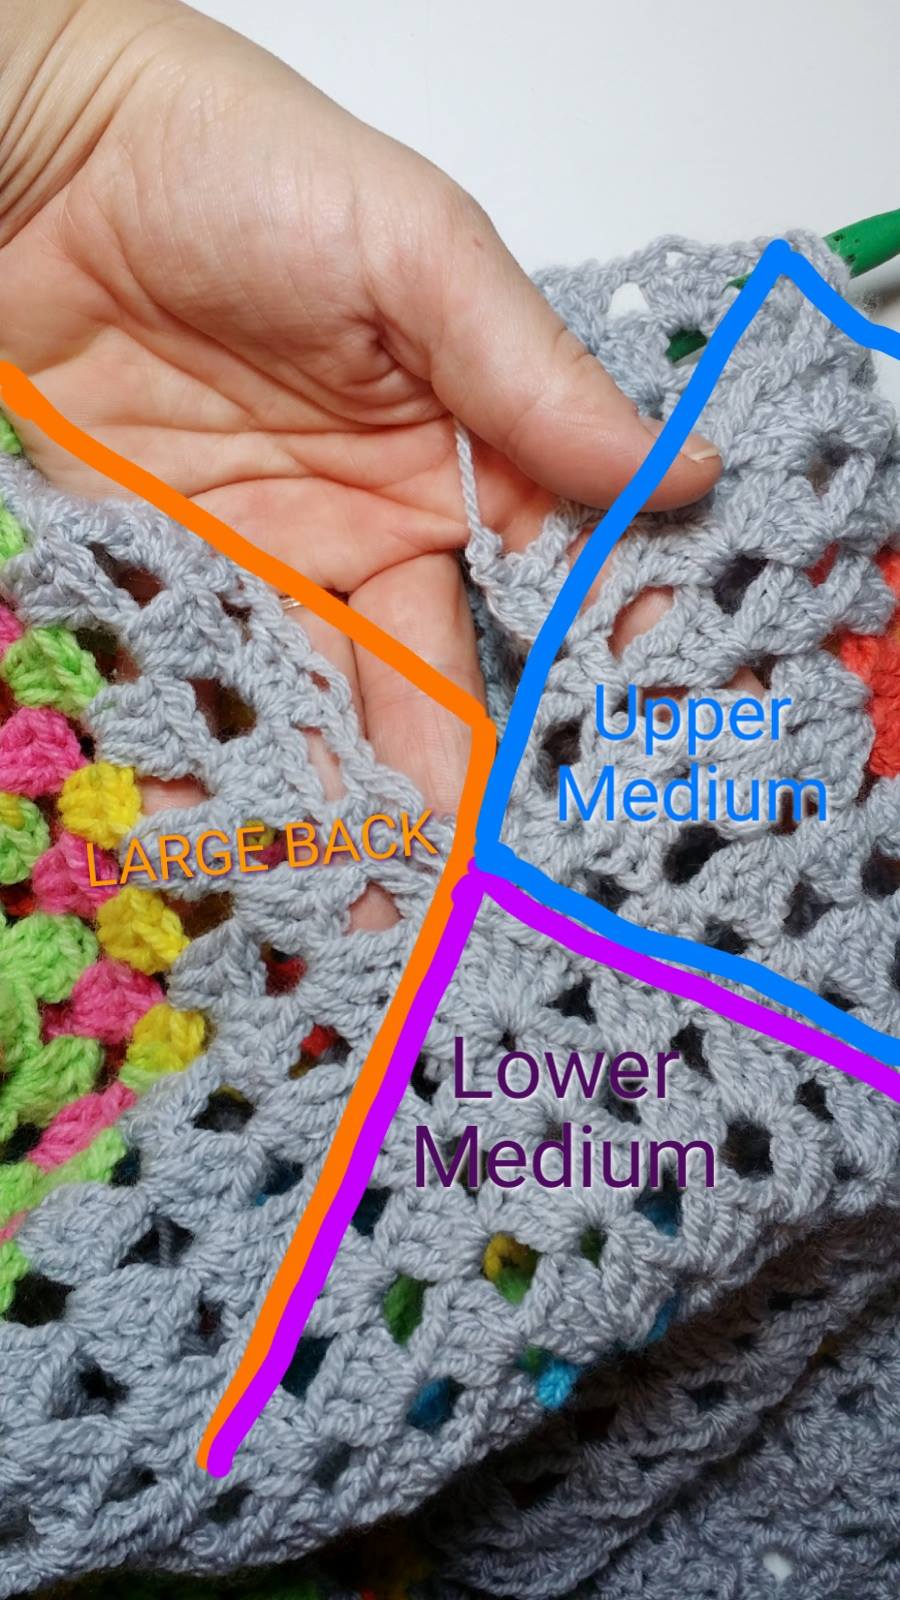
When working round 1 of the sleeves when you reach the armpit area, you will work:
- 3 dc into the 2nd dc of the corner 3dc group of the upper medium square (outlined in blue)
- ch 1, then work 3 dc into the 2nd dc of the 1st unworked 3dc group on the back large square (outlined in orange)
- no sleeve stitches are worked into any 3dc group of the lower medium square (outlined in purple)
When working round 1 of the sleeves when you reach the shoulder seam, you will work 3dc in the 2nd dc of the corner 3dc group of the large square, ch 1, then work 3 dc in the 2nd dc of the corner of the top of the upper medium square. Do not work into the seam.
Sleeves: DO NOT TURN ROUNDS THROUGHOUT
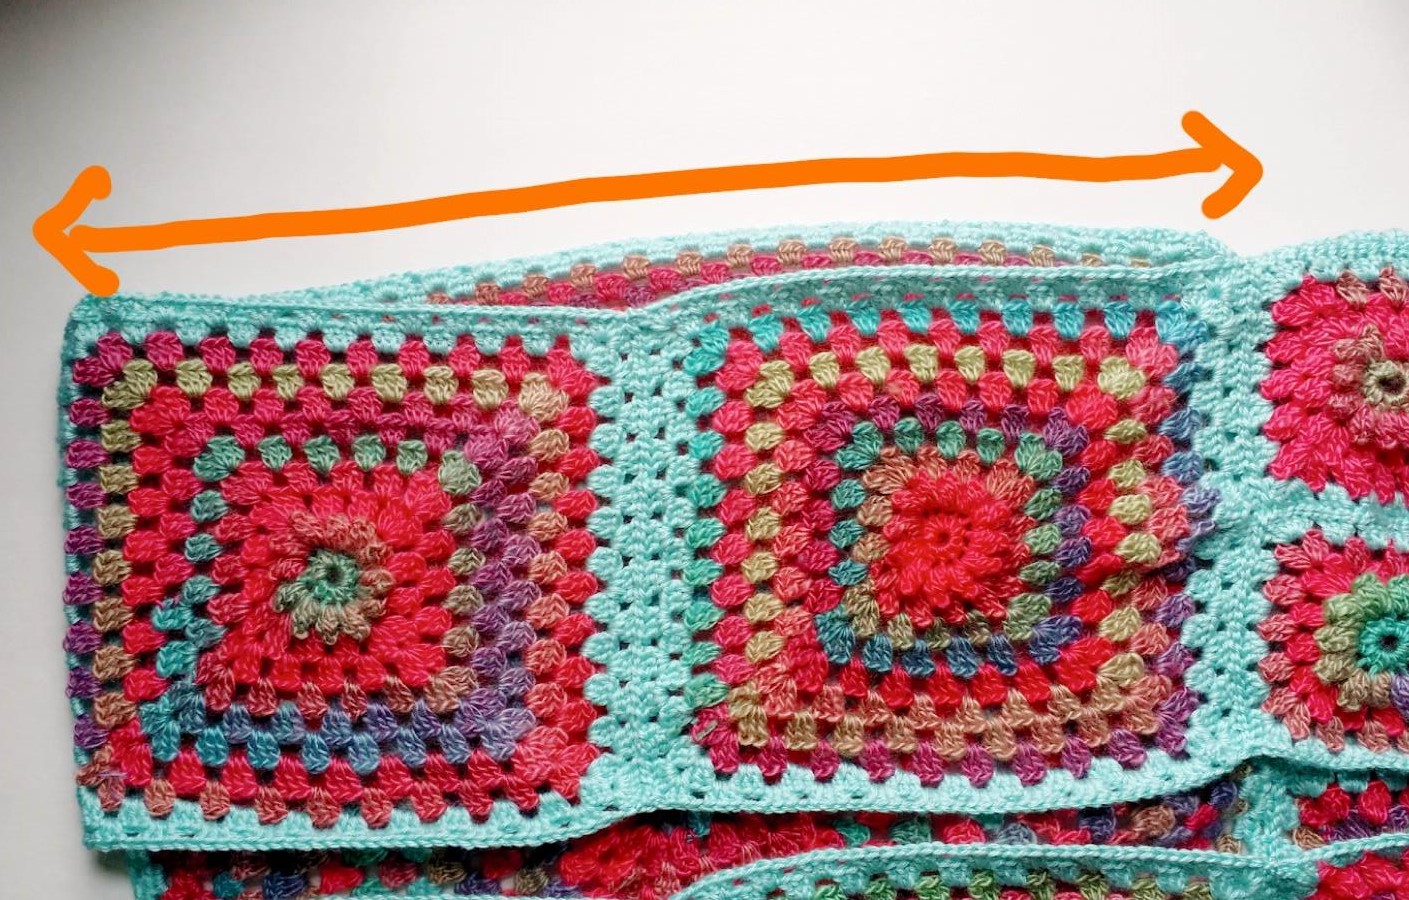
FIRST: SLIP THE ASSEMBLY ON YOUR BODY, Decide here if you feel you need more width. I prefer the garment to pulled somewhat taught across the back and taking advantage of the negative ease (when a garment is stretched to be worn) for wear. If you do NOT want this, refer to the Tips & Tricks Post HERE for methods on how to increase width if desired as well as other alterations that can be made to achieve the fit you desire. Example of location to add width is shown below and you will use the same method to do so as you do to create the sleeve, by picking up and working in rounds.
Rnd 1: with right side facing out and the sleeve opening facing away from you, use a sl st and join MC in the 2nd dc of 3dc group near the middle of the upper medium square (as shown in the photo below), ch 3 (counts as dc), 2 dc in the same st, ch 1, *3 dc in the 2nd dc of each 3dc group, ch 1, repeat from *, around, sl st to top of beg ch-3.
After round 1 is done, count the 3dc groups around, here is what you should have:
# of 3dc groups around:
XXS/XS: 16, S/M: 20, L/XL: 24, 2X/3X: 28, 4X/5X: 32
If you are off, double check the armpit area and the shoulder seam, as these are most likely where the error is.
Rnd 2: sl st to the 2nd dc of the 1st 3dc group, ch 3 (counts as dc), 2 dc in the same st, ch 1. *3 dc in the 2nd dc of each 3dc group, ch 1, repeat from *, around, sl st to top of beg ch-3, tie off after round 2 and go to EDGE ROUND for XXS/XS, S/M, L/XL, continue on for remaining sizes.
Rnd 3-4: repeat round 2, tie off for all remaining sizes and go to EDGE ROUND.
SLEEVE ALTERATION POINT: Should you desire a longer sleeve, do not tie off as stated for your size. Carry on repeating round 2 as many times as you like. Try it on as you go so you know when you are at the point you’d like to stop. Make note of the number of rounds so you can repeat it for the second sleeve. Remember the sleeves will be kimono or butterfly style in nature. When you are satisfied with the length, if you’ve chosen to alter, tie off and continue to the edge rounds.
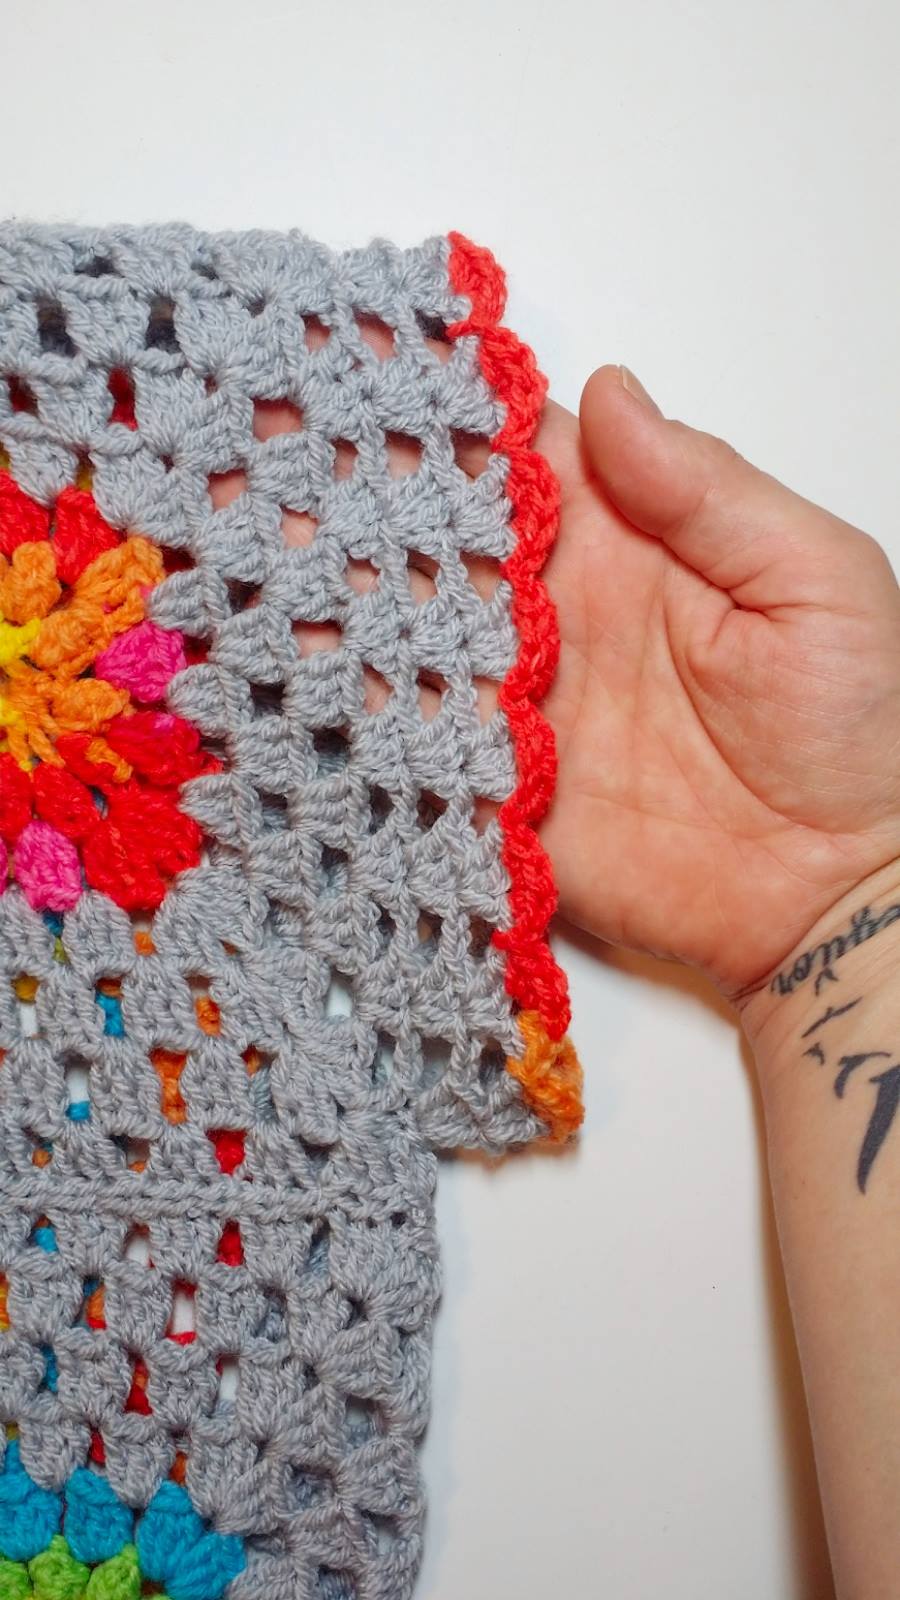
EDGE ROUND: with right side facing, join AC with a sl st in the 2nd dc of any 3dc group around the sleeve, ch 1 (does NOT count as a stitch), 4 hdc in the same st, sl st in the nxt ch-1 space, *4 hdc in the 2nd dc of the nxt 3dc group, sl st in the nxt ch-1 sp, repeat from * around, sl st to the top of the 1st hdc made, tie off.
Repeat everything for the second sleeve.
Below shows a sleeve completed for XXS/XS with no additional rounds added:
Finally, weave in any ends that remain.
TA-DA! Week 3 is DONE! *cue cheering and clapping soundtrack*
We are so close to being done now, it’s really looking like an actual garment!
Join me here next Wednesday May 11, 2016 for the LAST part of CAL!
I’m getting really excited to start seeing photos or all of you in your Garden Party Jackets all fancy and what not!!
***READY FOR PART 4? CLICK HERE!***
Much Love & Yarn,
Stephanie
Much Love & Credit Given to the Test Team: Nichole Chapel, Jamie Cowley, Janean Craig, Tammii Crosland, Maggie Diaz, Katherine Popowski, Amber Sarita, & Heather Sutton
The information and photos in this posting are the sole copyrighted property of Crochetverse©2016. Please do not copy and paste any of the information contained within either electronically, verbally, or written in part or in whole. Instead, please share the DIRECT LINK to this posting only, and if you do, I thank you for sharing. You of course may sell anything you make from this pattern that you have made with your own two hands, no contract labor or mass productions are permitted. If you credit Crochetverse as the designer when you sell, that is greatly appreciated. Thank you so much for respecting the hard work that goes into patterns, so that we may all remain creative 🙂
